Saturday, April 23, 2011

Playroom parts

I got a project done for the playroom!  I am way excited about it too.  I turned out better than I had imagined in my head.  I love when that happens!
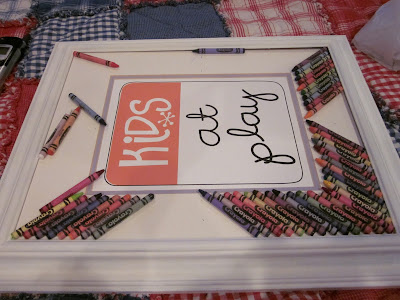
The hardest part was figuring out how to change directions of the crayons and make it all lay nice.
You could do them all one directions, it would be easy.  It just wasn't what I had in mind.
I found the Kids at play picture on my Silhouette.   I think its perfect for a playroom!
I found the frame at the DI awhile ago.  Bought it for a different project that ended up not being the right size.  It worked great for this though!
It came with the mat so I layed the crayons right on top and hot glued them in place.
I was worried the glue would melt the crayons but they didn't. 
Major Bonus in my book, plus it ended up costing me less than $5.00.
I'm excited to hang it up on the wall.
About the walls...

The playroom has one coat of paint on it.   I needs one more and I'm hoping I can squeeze that out of what I have left.
Want a peek?
It's fun, and exciting. 
And Bright!
The paint color is Nautical from Valspar.
It makes me smile each time I walk in the room.
shared at the stories of a2z , Just a Girl,

Thursday, April 7, 2011

A New life

Years ago my grandma gave me a shelf for my birthday. 
 It was a cute shelf and it got a home in my little girls room. 
Until we moved to this house and it really didn't match anymore.
~Ah Ha!~
Bring on the spray paint and a nice sunny day.
I have been waiting for a nice day all winter long to do this!
Hello cute little girly shelf.
I first took Kilz spray primer to it then some Heirloom White.
It hardly took any time at all!
I love the way she looks!
I am now in love with Heirloom white too.

So sweet!

Friday, April 1, 2011

A little Trickery

April fools is a fun holiday.  I have never liked the mean or yucky stuff but we have had lots of fun with food.  Some things aren't what they look like...
Last year we ate out of funny dishes and had "eggs" for dessert.  It was vanilla ice cream with marshallow creme on top with a little yellow center. 
This year we made sponge cake.  Thanks to family fun magazine!  When I saw this idea I knew my kids would have fun working on this one.
The Halloween plates give it a nice touch too, don't you think?!
First you are suppose to start with 2 layes of sponges.  That gives it the nice name of sponge cake...
When I found a 6 pack of these scrubbers I thought they looked more fun.  They come in the nice round shape and were a little bigger.  So thats what we did.
Give the kids a knife and let them have at it.


Frosting the scrubbers was a little harder than I thought.  I ended up doing the sides for them.  They did a great job on the top.  Then they got to do their favorite part.
The Sprinkles

Once they got done eating, I mean putting on all the sprinkles, you really can't tell that it's scrubbers under there.  Very fun little project.  Even my littlest loved doing it.  He didn't want any help at all.  This is how his cake turned out.
  Don't you think Papa is going to love getting this?